Sunday, October 30, 2016

SPOTLIGHT STORY- THE RENOVATION OF THE HAUNTED HACIENDA HOTEL


Hello all,

Yesterday I ventured downtown New Port Richey to take a tour of the Hacienda Hotel and to see the renovation project in the process there. I have been wanting to go inside the hotel for years. There are many rumors flying around of its haunted past. Such rumours are strange sounds, seeing strange objects sitting in hallways, and glimpses of a man in a dress shirt at one of the back windows of the hotel that fades away when you get near.

The hotel sits along the shores of the Pithlachascotee River in downtown New Port Richey. In the 1920's, though hard to believe, the hotel was once the place for Hollywood stars to retreat to. Stars like Thomas Meighan, Charlie Chaplin, Irving Berlin, Shirley Temple, Babe Ruth, Johnny Cash, and Gloria Swanson. The land was donated by James E. Meighan, the brother of silent movie star Thomas Meighan. It is rumored he won the land in a card game. They were both landowners in New Port Richey. The hotel was designed by Thomas Reed Martin. The hotel later served as a mental health facility for the elderly.

The renovation of the haunted Hacienda Hotel- our tour guide

The renovation of the haunted  Hacienda Hotel- outside


I took a short video of the start of the tour:


Our tour guide seemed very knowledgeable. She said the hotel has 45 rooms now, and they want to renovate it so it will have 65 rooms. I was surprised the hotel still looked in pretty good condition. The Friends of the Hacienda and Historic New Port Richey are trying to raise $70,000 to put towards the renovation. This was one of the first hotels where you could have your own private bathroom. Most hotels still shared bathrooms at the time. One of the rooms was named after Gloria Swanson because it was rumored she stayed there often.

I took video of my whole tour. I will share that story later. I have heard that there were secret tunnels under the hotel that were used to smuggle in alcohol and prostitutes during the Prohibition. Our guide said that a type of sonogram was done and that one of the tunnels  ran under the hotels hot water heater. It is also rumored to be another tunnel at the top of the stairs covered by red paneling. I didn't see any red paneling on the tour, but I did see quite a few boarded up doorways or openings.  It is also rumored that there is a secret floor that can be accessed from the outside called the Bordello. We walked around the backside of the hotel where the guide said the Bordello was.

The renovation of the haunted Hacienda Hotel- back of the hotel


Then we ventured into the basement. At this time I was still taking video. At the bottom of the stairs there was part of the room that was sanctioned off with what looked to be chicken wire and a door. On the wall inside the door was lettering that said "Killer Cage". When I walked around to get a better look my phone stopped recording. I couldn't get it to record anymore. So I took photos with my phone of the rest of the tour. I have no photos of the beginning since I was taking video at the time. What I found strange besides when it decided to stop recording, is for some reason I can't access any of my video. I'm still trying to view it with no luck! After the basement we went back upstairs through more rooms and hallways.

Then we get to the end of our tour and our guide says that this hallway is where most of their hauntings occur. That's when we go by room 16 where they have cups set up spelling a name across the floor. She said they spell out a name at night, and when they come back the cups have been moved to where they no longer spell anything. I found that very interesting. After the tour we took a short walk over to the Historical Society and talked with Jeff Miller to see if he could shed some light on some of the rumours. He affirmed that it did once serve as a mental facility for the elderly. He also affirmed that James Meighan won the hotel land in a card game. As far as silent film star Gloria Swanson frequenting the hotel, he has found no evidence of. He also has no knowledge of any of its haunted history or anything about the chicken wire caged room in the basement with the lettering "Killer Cage". Whatever you may believe it was great taking the tour. If you want to find out how to donate money to their fundraiser, their website is www.friendsofthehacienda.com.

The renovation of the haunted Hacienda Hotel- outside


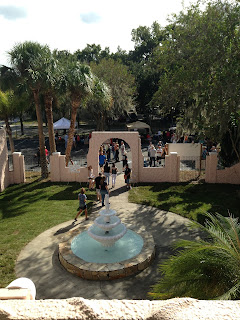
The renovation of the haunted Hacienda Hotel- outside fountain


The renovation of the haunted Hacienda Hotel- haunted cup room


The renovation of the haunted hacienda hotel- the haunted hallway

The renovation of the haunted Hacienda Hotel- haunted cup room


Friday, October 28, 2016

FLORIDA'S TOP 8 BEST CAMPGROUNDS

Hello all,

The weather is starting to get cooler out, even here in Florida. When I think of Fall, I think of family get togethers around a fire and camping. Florida has many wonderful campgrounds. I've put together a list of the top 8 best  Florida campgrounds for you to try!:

1. Fort Wilderness Campground - 4510 Fort Wilderness Trail, Orlando. I am dying to go to this one! It has dinner shows, character sing-a-longs, movies, hayrides, carriage rides, horseback riding, and fireworks on 750 acres of pine and cypress forests. It has exactly what you'd expect from a Disney campground, including the high price. For a family of four for a weeks stay at a preferred campsite its $534.00, less if you have your own RV.

Florida's top 8 best campground- Fort Wilderness


2. Florida Caverns State Park -3345 Caverns Road, Marianna. This park is home to the only open air caves in Florida. It costs $5 per vehicle, and only $20 for overnight camping. It also has hiking, biking, boating and fishing. Cave tours are extra. It also features a nine hole golf course.

Florida's top 8 best canpgrouns- Florida Caverns State Park


3. Silver River State Park - 1425 NE 58th Avenue, Ocala. This park is the home of the glass bottomed boat tours. If you camp on the weekends, you can also enjoy their pioneer cracker village, and their Silver River Museum. It's crystal clear water is great for canoeing. It has a full facility campground and 10 luxury cabins. Camping is $24.00 a night.

Florida's top 8 best campgrounds-Silver River State Park


5. Bahia Honda State Park - 36850 Overseas Hwy., Big Pine Key. This state park is known for its beaches, sunsets and snorkeling. you can also swim, fish, kayak, and boat. It also has a nature center and a full facility campground and cabins. Campsites are $36.00, cabins are $120-160.


Florida's top 8 best campgrounds- Bahia Honda State Park


6. Fort Clinch State Park - 2601 Atlantic Avenue, Fernandina Beach. This park sits on 1400 acres on Amelia Island. It has a fishing pier, swimming. Shelling and shark tooth hunting are popular. You can also visit the historic Fort Clinch where they have re-enactments from the Civil War. The fort is open everyday, and costs $2.00. The park has 69 campsites at $26.00 a night.


Florida's top 8 best campgrounds- Fort Clinch State Park


7. Fort DeSoto State Park - 3500 pinellas Bayway, S. Tierra Verde. This park has a 238 site full service campground . The campground has grills, electricity, washer and dryers, restrooms, showers,play area and a camp store. The park has a 7 mile waterfront that has fishing piers, hiking trails, canoe trails and swimming. Camping starts at $30.00.

Florida's top 8 best campground-Fort DeSoto State Park


8. Myakka River State Park - 13208 State rd. 72, Sarasota. This park has a natural wetlands area, a canopy walkway, and a tram safari. It sits on 58 acres and features swimming, fishing, canoeing and boating. The park has 82 campsites for tents that start at $26.00. Cabins start at $70.00


Florida's top 8 best campgrounds- Myakka River State Park


Wednesday, October 26, 2016

10 BEST FALL FREEBIES

Hello all

I wanted to share some great Fall freebies  with you I ran across recently. Seriously, who doesn't like to save money, especially this time of year! So enjoy these 10 best Fall freebies:

1. On October 27th, PF Chang's is having free sushi day! come to any one of their participating restaurants and you can get a free spicy tuna roll or a California roll, no purchase necessary. You just need to say its free sushi day,, and it's dine in only.

2. Okay, this one isn't exactly free but  it's close enough. At Olive Garden you can buy a kids meal for only $1 with the purchase of an adult entree. This offer is only available till october 30th, and you need to show them this coupon or you can print it out. http://e.olivegarden.com/H/2/v200000157f763b8e7a5c1aa369f35e926/HTML

3. At Starbucks, you can get a free drink when you sign up for their loyalty program and sign up for their emails. here's the link  https://www.starbucks.com/account/create/register

4. Though this one ends today, you can get 10 free cards at Tiny Prints with the code FREE10CARDS.

5. Purina is offering a free sample of their purina one cat food. Just fill out the form at  https://www.purinaone.com/cats/tender-selects-blend. I did this one today!

6. You can now get photo prints at Amazon for prime members. Right now they are offering 50 free 4X6 prints with free shipping with code OCT50PRINTS. You'll need to upload your photos to amazon drive.

7. Taco Bell is giving away free Doritos Locos  tacos on November 2nd from 2-6 pm because a base was stolen during the World Series.

8. The first Tuesday and Wednesday of every month the Lego store teaches how to build a mini model and they get to keep them for free. Coming up on November 1st and 2nd, they will be making a fox.

9. Sign up for Thrive Market's email list and you get a free 15 ounce organic coconut oil for just shipping and handling.  https://thrivemarket.com/giftbox/nutivacoconutoilmkt?utm_source=dedicatedmedia&utm_medium=affiliatemarketing&utm_campaign=29_&utm_content=giftbox_ncocooil&utm_term=cpl

10. Now at Clinique, you can get a free 7 piece gift with a $27 purchase plus 2 free extra treats. Just use the code MORE at checkout. it also gives you free shipping, such a great deal!  http://www.clinique.com/?cm_mmc=Linkshare-_-OOTtr9mlaCk-_-10001666-_-3


10 BEST FALL FREEBIES

Tuesday, October 25, 2016

Fall Flash Sale - 50% Off Fall Styles at Crazy8

This post contains affiliate links.

Take a look at this awesome sale for kids Fall clothes!

It's Fall time, time to bundle up your little ones! Run over to Crazy8 today to take advantage of HUGE savings! Beginning today, Crazy8 is offering 50% off fall styles

  Fall Flash Sale - 50% Off Fall Styles at Crazy8


Sunday, October 23, 2016

MY RECIPE CORNER - 3 EASY DELICIOUS PUMPKIN RECIPES

Hello all,

Fall is here. It's my favorite time of year. Time for sweaters, and everything pumpkin. In honor of this time of year I'm posting some easy delicious pumpkin recipes I found. Enjoy and let me know how they turned out!

1. Homemade pumpkin pudding ( cincy shopper) -

INGREDIENTS:
2 tbsp cornstarch
6 tbsp sugar
1 3/4 cups milk
1 egg
1/2 cup pumpkin puree
1 tsp vanilla
1.2 tsp cinnamon
dash salt
dash nutmeg

DIRECTIONS:
Whisk egg and milk together and set aside.
Whisk sugar and cornstarch together in a pan over medium heat.
Slowly add milk and egg mixture to pan stirring constantly.
Bring to a boil for one minute and remove from heat.
Mix together remaining ingredients.
Gradually add the pumpkin mixture to pan while constantly whisking.
Return to low heat and cook for 3-4 more minutes constantly whisking.
Remove from heat and let cool then top with whipped cream.


2. Pumpkin swirl chocolate brownies (comfort of cooking) -

INGREDIENTS:
For pumpkin swirl filling -
3 ounces cream cheese
1 large egg
1/2 cup canned pumpkin puree (not pumpkin pie filling)
3 tbsp sugar
1 tsp cinnamon
1/4 tsp nutmeg

For brownies -
1 18 ounce brownie mix, and what it calls for on the box.

DIRECTIONS:
Heat oven to 350 degrees.
Line a 9 inch pan with parchment paper and spray with cooking spray.
In a bowl beat all filling ingredients together and set aside.
In another bowl mix the brownies mix and its ingredients (what's called for on the box) together.
Pour 3/4 of the brownies mixture into the prepared pan.
Pour the pumpkin filling evenly over the brownies batter.
Then pour the remaining brownies mixture over that and then swirl through with a knife.
Bake 40-50 minutes till a toothpick comes out clean.


3. Pumpkin cheesecake (all recipes) -

INGREDIENTS:
2 8 ounce pkgs cream cheese
3/4 cups sugar
1 15 ounce can pumpkin puree
1 1/4 tsp cinnamon
1/4 tsp ginger
1/2 tsp nutmeg
2 large eggs
1/4 tsp salt
2 prepared pastry shells

DIRECTIONS:
Preheat oven to 350 degrees
Beat together pumpkin, sugar, spices and cream cheese, then add the eggs one at a time.
Add salt and beat until creamy. Pour into prepared shells.
Then bake at 350 degrees till knife inserted in the center comes out clean.

Easy delicious pumpkin recipes


Friday, October 21, 2016

IMPORTANT FIRST TIMER FACTS AND LITTLE KNOWN DISNEY SECRETS

LEARN THESE IMPORTANT FIRST TIMER FACTS AND LITTLE KNOWN DISNEY SECRETS

Hello all,

One of my most favorite places to visit in Florida is Disneyworld. In fact I'll be going with my granddaughter on her very first trip there next month! Of course I've done my research and found some important first timer facts to know before you go, and some little known Disney secrets to share!

One thing I feel that's important is Disney has a free app called My Disney Experience that shows you the ride wait times, maps, characters, FastPass reservations and dining info. This is one I definitely will be using. FastPass is something I'll have to try this time. It allows guests to reserve a time  for a ride at their choosing in advance. This way you avoid long lines for the ones you want to ride the most. You can do this the day you visit by going to one of the kiosks or by using the My Disney Experience app on your phone. It lets you schedule 3 FastPass reservations per park per day. Definitely a time saver. 

I've been hearing great things about Disney's MagicBands. Apparently they are only available here in Florida. It's a wristband with an embedded RFID chip that guests wear. It links to their tickets, resort room keys, dining reservations, FastPass info, and can even link to your credit card. It sounds very easy to use and convenient. 

This is an important first timer fact and time saving option for parents, the Rider Switch Pass. This allows one parent to stay with a child who isn't riding a particular ride. When the riding parent is done, the waiting parent can then use the pass and ride by using the fastpass return line. This pass is actually good for 3 people, so some who may have already rode can ride again.

If you are lucky enough to be staying at one of the Walt Disney World resorts, you can take advantage of their Extra Magic Hours. It lets you enter one hour before the official opening time, and stay for two hours after general public closing time. you can do a lot in that amount of time with very little people there.

Now for some little known Disney secrets:

Of the Presidential Seals in this country, one is located in the Hall of Presidents at Disney World. The other two are in the Oval Office and the hall where the Liberty Bell is housed.

Strategically placed devices called smellitizers are dispersed throughout the park and emit certain scents like the smell of cookies and vanilla on Main st. 

 Inside Cinderella Castle is a luxurious suite that can’t be booked and you can only stay there if you win a contest.

Utilidors is the name given to a secret tunnel system under the Magic Kingdom which is used by cast members and other employees to navigate the park unnoticed

 If you look, you’ll notice thousands of hidden Mickey’s through the parks.

 Gum isn’t sold in any of the park to minimize the risk of people disposing their gum on rides and dropping it on the ground.

 When Mr. Toad’s Wild Ride closed, a tombstone for Mr. Toad was placed in the graveyard at The Haunted Mansion.

The same dog is used in the Pirates of the Caribbean ride and the Carousel of Progress.

When Pirates of the Caribbean was being built in 1967, Disney Imagineers didn’t like the look of the false skeletons placed around the ride. So, with the help of UCLA medical school, they were able to place actual human skeletons around the ride. Most have been removed, though the skull and crossbones on the headboard are still human.

There are no bathrooms located in the Magic Kingdom’s Liberty Square. This is done to keep with the time period of that area.

Look down when in line at The Haunted Mansion, and you might spot a wedding ring embedded into the concrete. It’s believed to belong to the hanging bride who you see on the ride.

 Epcot’s American Pavilion is home to an American flag taken from the rubble of 9/11/2001.

 Guests in Walt Disney World are never more than 30 steps away from a trash can.

Visit The Hat shop on Main Street in the Magic Kingdom and you'll see an old pay phone on the wall. Pick up the receiver and you can eavesdrop on an interesting conversation.

 An imagineer named George was killed during the building of Pirates of the Caribbean.  It is said his ghost haunts the ride to this day. Workers say goodnight George before they shut down the ride each night as a superstition to prevent the attraction from breaking down the next day.

 The lake used for Fantasmic is only about 1 foot deep.

 You never have to pay for water in Disney World. Just go to any quick service restaurant in the park and ask for a cup.

When aboard the Mark Twain River Boat ride ask the pilots if you can visit the captains room. This is a secret code that will grant you access to the room the ship is piloted from.

Main Street USA is a little slice of Americana. Above this idyllic small town setting you’ll find about a dozen American flags. One thing though, none of them have 50 stars.

Columbia Harbor restaurant has two entrances. From the one in Fantasyland, the decor is British. From the one in Liberty Square, the decor is early American. The restaurant symbolizes crossing the Atlantic from Europe to America, from a land of castles and fairy tales to new, thriving colonies.

So enjoy yourself next time visiting Disney and be on the lookout for more secrets to uncover!


Important first timer facts and little known disney secrets

Important first timer facts and little known disney secrets

Important first timer facts and little known Disney secrets

Tuesday, October 18, 2016

6 AWESOME SCARY ADULT HALLOWEEN PARTY IDEAS

This post contains affiliate links.


Hello all,

When we think of Halloween we think of kids in costumes and trick or treating. But Halloween isn't just for kids anymore. Just as many adults are dressing up these days and throwing ghoulish parties. So I came up with a few awesome scary ideas for your adult Halloween party!:

1. Pumpkin keg - Did you know you can use a pumpkin as a keg. This is so easy I don't know why I never thought of it. It makes your party a little more festive. Take you pumpkin and hollow out like you do when you're carving. Then attach a spigot to the front. You can buy one at most retailers or just use an old one off any drink dispenser. You can also just use it as a festive punch bowl.  Fill and enjoy !

6 awesome scary adult Halloween  party idea pumpkin keg


2. Glowing jello shots - For these you need 2 c. tonic water, 2 packages jello (any flavor), 1 cup water and 1 cup vodka. To make the first layer pour one cup tonic water in a pot over high heat. When it boils and one package of jello and whisk until dissolved. Then pour in half a cup of water, and half a cup of vodka and stir. Pour into shot glasses 2/3's of the way filled and chill for 35 minutes. Then start the second layer the same way. Then top off the shots glasses with the second layer of jello and chill for 2-3 hours until set. Apparently the tonic water gives it the glow in the dark look. These drinks look awesome!


6 awesome scary adult Halloween party idea glowing jello shots


3.  Poisoned apple Halloween cocktail - This is definitely an awesome scary party idea! For this cocktail you need 2 ounces apple cider, 1 ounce pomegranate juice, 2 ounces tequila, a few small chips of dry ice. Combine ingredients in a shaker with ice. Add small ice chips to drink right before serving. Keep them small enough so they will dissolve quickly. It looks menacing!


6 awesome scary adult Halloween party idea poisoned apple Halloween cocktail


4. Severed hand sangria - The night before your party fill 2 latex gloves with filtered water and freeze overnight. In a big punch bowl add 2 bottles dry red wine, 3 cups sparkling water, 3 cups orange juice, 3 ounces brandy, 3 tbsp brown sugar, 2 thinly sliced oranges, 2 thinly sliced grapefruits, 2 thinly sliced lemons 2 thinly sliced limes and 1 cup natural cherries in sour syrup. Mix all together. Then remove the frozen ice from one of the latex gloves, It will take on the shape of a severed hand. Float it on top of the punch. You can even use the pumpkin as a punchbowl. This stuff is delicious!


6 awesome scary adult Halloween party idea severed hand sangria


5. Pumpkin cheese ball - With a mixer blend 16 ounces cream cheese, 1 1/2 cups shredded cheddar, 3 tbsp minced onion, 2 tbsp salsa, 2 tsp ground cumin, and 1 tsp minced jalapeno. Scoop onto a sheet of plastic wrap and shape into a pumpkin shaped ball. Chill 2 hours and unwrap. Then roll into some crushed tortilla chips, and insert a pepper stem into the top. Serve with black or blue tortilla chips.


6 awesome scary adult Halloween party idea pumpkin cheese ball

6. Cinnamon cider candied apples - Line a cookie sheet with parchment paper and spray with cooking spray. Combine 1 3/4 cups apple cider and 1/2 cup of brandy in a saucepan and bring to a boil. Cook until it's reduced to 3/4 cup. Add 2/3 cup cinnamon candies to the pan. Stir until dissolved and add 1 3/4 cups sugar, 1/8 tsp kosher salt, and stir until the sugar dissolves. Then cook without stirring till a candy thermometer reads 310 degrees. Let cool until it reads 210 degrees. Stick craft sticks into the apples and dip into hot syrup, then let cool on the prepared cookie sheet until set. Looks delicious!


6 awesome scary adult Halloween party idea cinnamon cider candied apples

Sunday, October 16, 2016

6 DIY EASY SCARY HALLOWEEN MAKEUP TUTORIALS

Hello all,

Halloween costumes can be costly. That's why I like to make my own. I have found some awesome DIY easy scary Halloween makeup tutorials I want to share with you. The results are amazing!

1. The Weeping Nun - This one looks just like the one from American Horror Story! Very creepy!

Directions:
Cover your brows completely with glue stick.
Apply translucent loose powder over them when dry.
Fully cover face with white face makeup and set using white powder.
Draw a tight line on your upper eyelid like you do with eyeliner, using a red gel liner with an angled brush.
Blend it out with a little red eyeshadow.
Apply black eyeliner to your bottom eye's water line.
Then using black face paint, from the bottom part of your eyes, paint drops going down your face.

DIY easy scary Halloween makeup tutorials The Weeping Nun.


2. The Zombie - This one doesn't look too hard and reminds of The Walking Dead zombies!

Directions:
Cover your face with a foundation that is a few shades lighter than your regular skin tone.
Use a black gel eyeliner as eyeshadow and blend quickly so it doesn't dry out.
Apply light brown or black eyeshadow completely around your eyes for a sunken-in zombie look.
Apply a red blush under your eyes, and directly under your eyebrows to give the appearance of being bloodshot.
Then line your waterline with a red eye pencil.
Use a black eyeliner to draw vein like lines around your eyes.
Then apply black mascara.
Contour your cheeks with dirt colored eyeshadow to make them look hollow.
Then use the same black gel eyeliner you used on your eyes and apply to the center of your lips, then cover the rest with red lipstick, a no shine color.
Finish off with a red lip gloss drips under your eyes and lips for the appearance of blood.

DIY easy scary Halloween makeup tutorials The Zombie.


3. Sugar Skull - This  DIY scary makeup tutorial  looks a little difficult, but the results are stunning!

Directions:
With a nude pencil draw circles around your eyes, above your eyebrow and around under your eye area. Then apply a black eyeliner to your water line.
Mix black and purple face paint or cream shadow together and fill in the circles around your eyes.
Mix together some purple and pink pigment and paint it over your eyes to give it some shine.
Using white face paint cover your whole face, even your lips.
Then apply some translucent powder to set it.
Apply a pink powdered blush underneath the cheekbones and above the brow bone, and to your lips.
Make an upside down U on the bridge of your nose with black face paint, then fill in the bend of your nose.
To create the flower along the eye sockets, take a flat brush and dip one side in orange paint, the other in pink.
Take the brush and apply it flat to your face like a stamp all the way around your eyes.
Add a flower the same way on your forehead.
Take a brush and apply black paint to the inside of your lips.Then with a thinner brush draw a line from the corner of your mouth outwards to elongate it. Then draw a line through the center to connect them.
For the teeth, start with a line down the middle of the mouth working outward and draw lines down the rest of the mouth.
Finish by drawing a flower and some dots to the chin.

DIY easy scary Halloween makeup tutorials The Sugar Skull.


4. Pop Art - This one looks awesome!

Directions:
Draw a bold black cat-eye with black liquid eye liner.
Outline your eyes with black pencil liner and fill them all the way in.
Draw thin black lines along your features to give your face dimension.
Make your eyelashes more cartoon like by drawing them on your upper and lower eyelids with black liner.
Cover your entire face with small red dots about a centimeter apart with red liner.
Line your lips with the same red liner and fill them in.
Outline your lips with black pencil liner. Make them more cartoonish by drawing a small white line on one side of your lower lip.

DIY easy scary Halloween makeup tutorials Pop Art.


5. Egyptian Queen - For those of you who don't like scary!

Directions:
Apply a gold cream shadow from inside from the corner of the eye to the middle.
Use a flat brush and sketch a cat eye shape with purple cream eyeshadow extending beyond your eye.
Pat on the purple shadow to fill in the area. Pat a thin layer of glitter adhesive to the gold cream shadow.
Dip your finger into loose glitter and press over the gold shadow. Repeat with the purple.
Using black liquid liner draw your outside wing by creating a diagonal line from the corner of the eye to the end of the brow.
Create a thin to thick line from the inside of your eye to your natural crease. Connect to your first line and thicken.
Line below your lower lash line with the same liquid liner. On your right eye you can create the peak at the center and backwards J shape at the center. This mimics the eye of Horus.
On the left line you can simply line below, flaring out the line at the outer corner and inner.
Apply mascara to both upper and lower lashes. Now apply a line of false eyelashes.
Apply a deep purple lipstick. Accessorize with gold jewelry and a headpiece.

DIY easy scary Halloween makeup tutorials The Egyptian Queen.


6. The Skeleton - This is one for the guys, and looks so spooky!

Directions:
Coat eyebrows with a glue stick and use translucent powder to set.
Apply white cream make up over the entire face, down the neck and on the lips, but not around eyes.
Fill in the hollow of the eyes with a black cream makeup.
Use a brush to blend the makeup down the sides of the nose to accentuate the bridge.
To apply bony contours apply black cream makeup to outline the bottom of the cheekbone. Take the line all the way up to the hairline to the middle of the forehead about an inch above the brow.
Starting with the cheek blend downwards to create a look of shadow. Soften the lines and blend downward.
Draw a triangle on the tip of the nose and lightly blend downwards.
Use a black eyeliner pencil to draw horizontal oval shapes down the neck. Fill in half of the oval shape with black makeup, the rest with white.
Use a black eyeliner pencil to line where the lips meet. Extend the lip line about two inches from each side of the mouth. use the pencil to outline teeth. Fill in some of the teeth with black to represent missing teeth.
Set with translucent powder.

DIY easy scary Halloween Makeup tutorials The Skeleton.


Thursday, October 13, 2016

MY RECIPE CORNER - HOW TO MAKE DELICIOUSLY TERRIFYING WITCH FINGER COOKIES

Hello all,

One thing I love to do this time of year is bake. There are so many recipes to try. In honor of Halloween I made this one. It goes hand in hand with this awesome Halloween book I can't wait to read to my grand daughter. It's called Room on the Broom by Julia Donaldson. The recipe is for severed witch finger cookies. Aside from the fact they're delicious, they are easy to make and the end product is so life like and amazing. Take a look -


When I made them I used a roll of store bought sugar cookie dough, but if you want to make your own dough, here's what you need for that -


INGREDIENTS FOR COOKIE DOUGH:

1 cup of softened butter
1 cup sugar
1 egg
1 tsp vanilla extract
1 tsp almond extract
1 tsp baking powder
1 tsp salt
2 2/3 cups of flour


THE REST OF THE INGREDIENTS:

sliced almonds
coca powder
tube of red decorating gel


DIRECTIONS:

Roll out small amounts of cookie dough on a floured surface. Roll it into thin strips. Remember, they will spread out when they cook. Press a sliced almond into one end of the cookie. This will look like a fingernail. Scour the cookie in the middle with a knife for the knuckle. Dust with a little bit of cocoa powder around the knuckle and nail. It gives the fingers the appearance of being dirty. Bake as directed on the package or at 325 degrees for about 10 minutes until done. Let cool. Then add a little of the red decorating gel on the ends to give the appearance of blood. Enjoy!


severed witch finger cookies


This post is part of the Kid's Halloween Books Blog Hop hosted by Beyond Mommying. Check out all the other great posts and follow along with #HalloweenKidsHop.


Tuesday, October 11, 2016

8 FREE EASY SCARY HALLOWEEN PUMPKIN TEMPLATES

This post may contain affiliate links. 

Hello all,

I just love this time of year! Everyone is dusting off the Halloween decorations. Everywhere you look you start to see pumpkins. I know me and my kids loved carving pumpkins when they were younger, and we still do! The hard part was coming up with new ideas. So I've made it easy and I found some awesome free Halloween pumpkin templates and designs you can use this year. Don't forget the supplies like a pumpkin carving kittea lights to light them safely,  and papers to line your tables for an easy cleanup!  Enjoy!

1. Witches are my favorite! I found this awesome free Halloween pumpkin template! Here's what it looks like with a link to the free template. If you don't like this one the site has 700 more to choose from! The site is http://www.pumpkinlady.com/pumpkin-carving-patterns/free-pumpkin-carving-patterns/page/2/
Here's the one I like -

free witch Halloween pumpkin template


2. My kids loved carving ghosts. This awesome free Halloween pumpkin template is to a ghost I want to try this year. This site here has hundreds to choose from  http://www.pumpkinpile.com/ .  Here is the ghost template I found -

free ghost Halloween pumpkin template


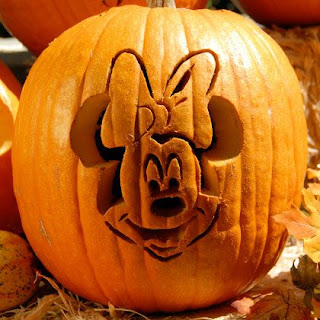
3. If your kids or grandkids are like mine, they love Disney! This site has so many awesome free Disney template to choose from. I might have a hard time choosing which one to try. The site is https://family.disney.com/pumpkin-carving-ideas/. I found this awesome Halloween pumpkin template I just love! -

free Minnie Mouse Halloween pumpkin template


4. For more traditional images for your pumpkins, this site has over 100 free templates to choose from. The site is http://www.celebrating-halloween.com/pumpkincarving . I have a black cat, so I  love adding black cats to my Halloween decorations. Here is an awesome black cat template to use -

free black cat Halloween pumpkin template


5.  If you like just carving traditional pumpkin faces, this site has 27 free templates to look through. The site is http://www.rd.com/home/decorating/pumpkin-carving-patterns-ideas/2/. I found this cute one to try -

free Halloween pumpkin template


6. I found some scary free templates , 28 in all on this site http://www.dotcomwomen.com/crafts/free-pumpkin-carving-patterns-stencils-and-patterns-for-carving-halloween-pumpkins/4283/. This one is definitely worth trying -

free RIP pumpkin template


7. If you're looking for simple kid friendly free templates, this site has 13 that your kids will love. It's  http://familycrafts.about.com/od/pumpkincarving/ig/Pumpkin-Carving-Patterns/?_ga=1.92589534.2146492418.1476194270. I think we'll be trying out this frankenstein one -

free frankenstein Halloween  pumpkin template


8. No Halloween decoration is complete without spooky spiders and bats.This site has them all. It's http://www.dltk-holidays.com/halloween/mpatterns.htm . Speaking of creepy spiders, check this one out -

free spider Halloween pumpkin template


Sunday, October 9, 2016

8 SCARY AFFORDABLE DIY HALLOWEEN DECORATIONS

This post may contain affiliate links.

Hello all,

One of my favorite times of year is here! Decorating can be expensive, so like most of us my decorations are usually DIY. I've listed some of the scariest affordable  DIY Halloween decorations I could find.
Have fun!

1 .zombie trap - This one looks so creepy and sounds super easy to do. Dig a shallow hole. Make it the width of a pallet. Put an orange or red light into the hole, close enough to a plug in. Set a pallet on top of the hole with the light in it. Put two zombie hands (Halloween decorations) poking through some of the slats of the pallet. Voila! A zombie trap.

zombie trap

2. head in a jar - This is another easy one to do. You need a 3D printed image of a face, a jar big enough to hold the printout, water and food coloring. Start by printing out the face image, you can find one here https://www.google.com/search?q=3D+face+texture+map . Print out the image and roll it to fit into your jar. An old masons jar works great! Then fill it up with water, and add a few drops of food coloring ( a little green will make it look like formaldehyde)  and you have a very spooky looking severed head in a jar! Glue on a little hair to complete the look!

severed head in a jar

3. spooky eyes in the bushes - This one is easy and effective. Cut out pairs of eyes out of empty toilet tubes. Insert a glow stick into the toilet tubes and hide them in the bushes. The effects are very creepy for a very cheap price.

spooky eyes


4. dead bodies - Here's another cheap one. Stuff garbage bags with packing foam and use duct tape to form into body shapes. Dress in clothes. Then stuff in clear bags and wrap again in duct tape. Add red paint for blood effect. Hang from trees or display the bodies on your lawn. Very chilling.

dead body forms

dead bodies


5. chicken wire ghost - Use chicken wire, its the same fencing you may use at your own home.  To shape the head bend wire over a head shape like a basketball. bend the excess to make a neck. For the torso, cut a 40 inch piece of chicken wire, overlap the ends and twist. For the arms cut a 32 inch length of wire and roll. Make two arms, and pinch wire to make elbow and wrist joints. Use smaller wire to fix the arms to the torso. To make the skirt, cut a 36 inch in length wire and attach to the waist of the torso. You can paint these with glow in the dark paint for an eerie ghost effect. You can also make them another way without separating the body parts, and just make a body form. 


6. spooky Halloween lanterns - This one looks fun and easy.  Draw creepy faces on empty milk jugs with marker. Place led light or Christmas lights inside. Display. This makes for very spooky lights for your yard. 

spooky lights

7. spider egg sack - You will need a few supplies for this one. You need a foam egg, white batting, a white stocking, plastic spiders, a hot glue gun. To make each egg sack, wrap each foam egg in the white batting. Pull a white stocking over the ball. Position the plastic spiders inside the stocking, and between the batting, and fix some to the outside with the hot glue gun. Then hang from your porch ceiling or from a tree with hooks. 

spider sack


8. floating candles - You'll need a few items for this one: paper towel rolls, white acrylic paint, a hot glue gun, tea lights, clear plastic string, white paper, and tape. Trace the bottom of the tubes on the white paper and cut out. Glue into place on the bottom of the tubes.  Paint the empty towel tubes white and use the hot glue gun to create fake wax dripping down the candle. Set the tea light candle in the end and poke 2 holes one on each side of where the candle sits in the tube. Remove the candle and insert the plastic string through the tube through the holes and knot at the end. The tea light should sit on top of the plastic string to hold it in place. Insert a tea light at the end and hang from your porch with the clear plastic string. Creates eerie floating candles. 


floating candles